

해당 포스트는 자바스크립트 완벽 가이드라는 교재로 스터디를 하면서 6장을 정리한 포스트입니다.
주관적으로 해석한 내용이 들어가 있어서 잘못된 내용이 포함될 수 있습니다.
또한 교재의 모든 내용을 정리하지 않고 주관적인 판단에 의해 필요한 내용만 작성했습니다.
📌 용어 정리
0️⃣ 런타임
JavaScript가 실행중인 시점을 의미
1️⃣ prototype
생성자 함수가 갖고 있는 특별한 property
생성자 함수로 생성한 객체가 사용할 수 있는 객체
2️⃣ [[Prototype]]
생성자 함수로 생성한 객체가 갖고 있는 property
현재 객체의 생성자 함수의 prototype을 가리키는 값을 갖고 있는 숨김 property
3️⃣ __proto__
현재 객체의 [[Prototype]]에 접근할 수 있는 접근자 property
생략 가능한 property ( 코어 자바스크립트 151p )
❓ 객체란 무엇인가
객체란 property의 순서 없는 집합입니다. ( aka hash, hash table, dictionary, associative array )
객체의 key에는 string과 Symbol만 가능합니다.
객체의 value에는 any가 가능합니다.
string, number, undefined, symbol, boolean, null, bigint을 제외하고 모두 객체입니다.
🔎 객체 검색과 설정 방법
Dot Notation을 이용한 객체 접근법이 편하지만 예외적으로 사용할 수 없는 경우들이 존재합니다.
key는string/symbol이면 무엇이든 가능하지만,Dot Notation에 의한 접근은 식별자 네이밍 규칙을 지켜야 접근이 가능합니다. ( 확실하지 않음 )key를 변수로 사용하고 싶은 경우 즉, 런타임에 결정하고 싶은 경우Dot Notation로 표현이 불가능합니다.
0️⃣ Dot Notation ( . )
식별자 네이밍 규칙에 만족하는 key를 갖는 경우 .로 접근하면 비교적 편합니다.
1
2
3
4
5
6
7
8
9
10
const KEY = "x";

const obj = {
  x: 10,
  "api-key": "keyboardcat",
};

obj.x; // 10
obj.api-key; // 불가능한 접근법
obj.KEY; // undefined
1️⃣ Bracket Notation
[]를 이용해서 객체의 key에 접근하는 방법입니다.
1
2
3
4
5
6
7
8
9
10
const KEY = "x";

const obj = {
  x: 10,
  "api-key": "keyboardcat",
};

obj["x"]; // 10
obj["api-key"]; // "keyboardcat"
obj[KEY]; // 10
✂️ 객체 생성 방법
0️⃣ 객체 리터럴
일반적으로 가장 많이 사용하는 객체 생성 방법입니다.
리터럴이 평가되는 순간 즉, 런타임에 정해지기 때문에 변수를 사용((1))할 수 있습니다.
1
2
3
4
5
6
7
8
9
10
11
12
13
14
const genderKey = "gender";
const genderValue = true;

const person = {
  // (1)
  [genderKey]: genderValue,
  name: "alice",
  age: 26, // "Trailing commas" ( 개인적으로 좋아하는 방법... 확장성이 좋음 )
};

console.log(person); // { gender: true, name: 'alice', age: 26 }

// 객체 리터럴은 "Object"를 상속 받습니다.
console.log(person.__proto__ === Object.prototype); // true
1️⃣ new Object()
Object를 생성자 함수로 사용할 수 있기 때문에 new로 객체를 생성할 수 있습니다.
Object 이외의 다른 것들도 생성자 함수가 존재합니다. ( Array, Map, Set 등 )
1
2
3
4
5
6
7
8
9
const obj1 = new Object();
const arr1 = new Array();

// 사실 "new"를 안붙여도 내부적으로 생성자 함수로 동작합니다. ( 하지만 좋지 않은 방식 )
const obj2 = Object();
const arr2 = Array();

// 생성자 함수를 이용한 객체 생성은 "Object"를 상속 받습니다.
console.log(obj1.__proto__ === Object.prototype); // true
2️⃣ Object.create()
이전 방법들과는 조금 다르게 Prototype을 정해서 객체를 생성하는 방법입니다.
1
2
3
4
5
6
7
8
9
10
11
12
13
14
15
16
const person = { name: "alice", age: 26 };

const me = Object.create(person);
me.gender = true;

console.log(me); // { gender: true }
console.log(me.age); // 26
console.log(me.__proto__ === person); // true
console.log(Object.getPrototypeOf(me) === person); // true

console.dir(me);

for(let k in me){
  console.log(k);
}
console.log({ ...me });
3️⃣ Object.create() 활용 방법
서드 파티란 프로그래밍을 도와주는 플러그인 or 라이브러리를 의미 (Express,lodash등 )
서드 파티 라이브러리에서 사용자가 객체를 변경하는 사고를 막는 경우 사용된다고 하네요.
1
2
3
4
5
6
7
8
9
10
11
12
13
14
15
// "person"이라는 서드 파티가 존재한다고 가정
const person = { name: "alice", age: 26 };

// 서드 파티를 프로토타입으로 갖는 객체 생성하고 그 객체를 사용자에게 제공함
const me = Object.create(person);

// 사용자가 행동을 취해도 원본에는 영향이 가지 않음
me.age = 30;

// 이러면 영향이 가는데 이거는 잘 모르겠네요... ( 의도를 잘못 파악한걸까요? )
// 아니면 애초에 "__proto__"로 접근하는 것이 부적절한 것일지도 모르겠음
me.__proto__.age = 3000;

// "Prototype"엔 변화가 없음 ( 아마 이런 의도인 것 같음 ( 확실하지 않음 ) )
console.dir(me);
⛓️ Prototype Chain ( [] )
JavaScript의 객체는 자체 property와 Prototype을 상속받는 property가 있습니다.
Prototype을 상속받는 property는 [[Prototype]]를 입니다.
하지만 [[Prototype]]은 직접적으로 접근할 수 없기 때문에 다른 방식으로 접근해야합니다.
그때 사용하는 방법이 __proto__ or Object.prototype.getPrototypeOf()/Object.prototype.setPrototypeOf()입니다.
Prototype Chain이란 객체의 [[Prototype]]를 통해 생성자의 prototype을 체인 형식으로 타고타고 접근해서 원하는 값을 얻는 방법을 의미합니다.
0️⃣ Prototype 접근 방법
[[Prototype]]인 숨김 프로퍼티에 접근하는 방법이 여러 가지 있습니다.
주의해야 할 점은 [[Prototype]]를 수정하는 행동은 지양하는 게 좋다는 것입니다.
소요되는 시간도 오래 걸리고, 이미 작성된 다른 코드들에 영향을 끼칠 수 있기 때문입니다.
개인적으로 __proto__가 좀 더 직관적이라고 생각해서 예시에는 __proto__를 사용하겠습니다.
( MDN에서는 Object.getPrototypeOf() 사용을 권장합니다. )
1
2
3
4
5
6
7
8
9
10
const person = {
  name: "alice",
  age: 26,
};

// "Object.prototype.__proto__"로 접근하기
console.log(person.__proto__ === Object.prototype); // true

// "Object.getPrototypeOf()"로 접근하기
console.log(Object.getPrototypeOf(person) === Object.prototype); // true
1️⃣ Prototype Chain 검색 방법
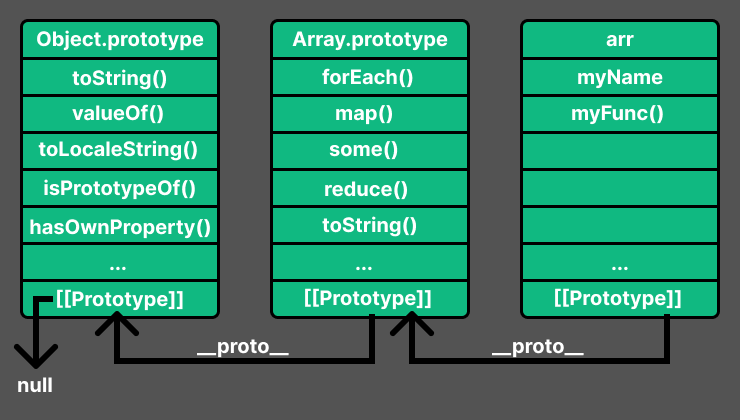 프로토타입 체인
- 본인의
property검색 ( 없으면2로 ) [[Prototype]]에 적힌 객체를 찾아가서 검색 ( 없으면3으로 )[[Prototype]]에 적힌 객체의[[Prototype]]에 적힌 객체를 찾아가서 검색 ( 없으면4로 )- 계속 탐색하면서
[[Prototype]]이null일 때까지 탐색 ( 일반적으로Object.prototype의[[Prototype]]즉Object.prototype.__proto__)
1
2
3
4
5
6
7
8
9
10
11
12
13
14
15
16
17
18
19
20
21
22
23
24
25
const arr = [];
arr.myName = "alice";
arr.myFunc = () => {
  console.log(`hello, ${this.myName}`);
};

/**
 * 1. 본인("[]")의 "property"에서 "valueOf()" 검색 ( 실패 -> 2로 이동 )
 * 2. 본인("[]")의 "[[Prototype]]"가 가리키는 "Array.prototype"에서 "valueOf()" 검색 ( 실패 -> 3으로 이동 )
 * 3. "Array.prototype"의 "[[Prototype]]"가 가리키는 "Object.prototype"에서 "valueOf()" 검색 ( 성공 -> 가져와서 사용 )
 */
console.log((arr).valueOf() === arr); // true

// 3번에서 찾았다는 증거
console.log(arr.hasOwnProperty("valueOf")); // false
console.log(Array.prototype.hasOwnProperty("valueOf")); // false
console.log(Object.prototype.hasOwnProperty("valueOf")); // true

// ==================== ====================

// 일반적이지 않은 경우 예시
const strangeObject = Object.create(null);

// // 모든 객체가 갖는 "toString()" 조차 사용할 수 없음 ( TypeError: strangeObject.toString is not a function )
// console.log(strangeObject.toString());
2️⃣ Scope chain vs Prototype Chain
Scope chain은 변수의 유효 범위를 찾는데 사용되는 개념입니다.
좀 더 정확하게 말하자면 Execution Context의 각각의 Lexical Environment의 Environment Record의 Outer Lexical Reference를 통해서 스코프 체인을 만들어냅니다.
Prototype Chain은 특정 객체에 속하는 메서드와 멤버들을 찾는데 사용되는 개념입니다.
1
2
3
4
5
6
7
8
9
10
11
12
13
14
15
16
const outer = () => {
  const person = { name: "alice" };

  const inner = () => {
    const inside = () => {
      // (1)
      console.log(person.toString()); // "[object Object]"
    };

    inside();
  };

  inner();
};

outer();
(1)에서 먼저 Scope chain을 통해서 person을 찾습니다. ( inside() -> inner() -> outer() -> person )
그리고 Prototype Chain을 통해서 toString()을 찾습니다. ( person -> Object.prototype -> toString() )
즉, JavaScript 코드를 실행하면(런타임) 보이지 않는 곳에서 실행 컨텍스트, 스코프, 프로토타입 등의 많은 개념들이 어우러져서 실행되게 됩니다.
🧐 객체의 특징
0️⃣ 객체의 복사
원시/참조 타입을 보면 알 수 있듯이 객체는 참조에 의한 복사가 일어납니다. ( call by reference )
1
2
3
4
5
6
7
8
9
10
const person = {
  name: "alice",
  age: 26,
};

const me = person;

me.age = 25.5;

console.log(person.age); // 25.5
1️⃣ 프로퍼티의 속성 세 가지
객체의 프로퍼티는 모두 writable, enumerable, configurable 세 가지 속성을 내부적으로 갖고 있습니다.
1
2
3
4
5
6
7
8
9
10
11
12
13
14
15
16
17
const person = {
  name: "alice",
  age: 26,
  say() {
    console.log("hi");
  },
};

console.log(Object.getOwnPropertyDescriptor(person, "age"));
/**
 * {
 *   value: 26,
 *   writable: true,
 *   enumerable: true,
 *   configurable: true
 * }
 */
세 가지 속성은 각자의 역할이 있습니다.
1
2
3
4
5
6
7
8
9
// "writable"는 쓰기 가는 여부입니다. ( 즉, 수정 가능 여부죠. )

Object.defineProperty(person, "age", {
  writable: false,
});

person.age = 30;

console.log(person.age); // 26
1
2
3
4
5
6
7
8
9
10
11
12
13
14
15
// "enumerable"은 열거 가능 여부입니다.

Object.defineProperty(person, "age", {
  enumerable: false,
});

// 열거 즉, "for in"문의 탐색에서 제외됩니다.
for (const key in person) {
  console.log(person[key]); // alice [Function: say]
}
// 물론 "spread operator"를 통한 열거에도 제외됩니다. ( + "Object.keys()" )
console.log({ ...person }); // { name: "alice", say: [Function: say] }

// "spread operator"의 경우 본인이 가지고 있지 않은 즉, "prototype chain"에 존재하는 메서드/멤버들도 열거 대상에서 제외됩니다. ( toString )
console.log(person.toString());
1
2
3
4
5
6
7
8
9
10
11
12
13
14
15
16
17
18
// "configurable"은 속성에 대한 수정 가능 여부입니다. ( "delete" 연산자 포함 / "writable" 제외 )

Object.defineProperty(person, "age", {
  configurable: false,
});

// 정상 동작
Object.defineProperty(person, "age", {
  writable: false,
});

// // TypeError: Cannot redefine property: age
// Object.defineProperty(person, "age", {
//     enumerable: false,
// });

console.log(delete person.age); // false
console.log(person.age); // 26
⚙️ property 조작
0️⃣ delete 연산자
delete 연산자를 이용해서 삭제합니다.
주의할 점은 값 자체를 삭제하는 것이 아닌 property에서만 삭제한다는 것입니다. ( 참고 예시 )
1️⃣ in 연사자 vs hasOwnProperty() vs propertyIsEnumerable()
세 가지 모두 property가 존재하는지 확인할 수 있는 방법입니다.
1
2
3
4
5
6
7
8
9
10
11
12
13
14
15
16
17
18
19
const person = {
    name: "alice",
    age: 26,
};

Object.defineProperty(person, "name", { enumerable: false });

// 단순히 사용할 수 있는지 판단 ( 프로토타입 체인에서 존재해도 됨 )
console.log("name" in person); // true
console.log("toString" in person); // true

// 본인이 가지고 있는지 판단
console.log(person.hasOwnProperty("name")); // true
console.log(person.hasOwnProperty("toString")); // false

// 본인이 가지고 있으며 열거 가능인지 판단
console.log(person.propertyIsEnumerable("age")); // true
console.log(person.propertyIsEnumerable("name")); // false
console.log(person.propertyIsEnumerable("toString")); // false
2️⃣ property 열거
1. for ~ in vs spread operator vs Object.keys()
1
2
3
4
5
6
7
8
9
10
11
12
13
14
15
16
17
18
const prototypePerson = {
  name: "alice",
  age: 26,
  say() {
    console.log("hi");
  },
};

const person = Object.create(prototypePerson);

person.x = 10;

for (const key in person) {
  console.log(key); // x name age say
}

console.log({ ...person }); // { x: 10 }
console.log(Object.keys(person)); // "x"
2. Object.getOwnPropertyNames() / Object.getOwnPropertySymbols() / Reflect.ownKeys()
1
2
3
4
5
6
7
8
9
10
11
12
13
14
15
16
17
18
19
20
21
const uniqueKey = Symbol("keyboard cat");

const person = {
    name: "alice",
    age: 26,
    say() {
        console.log("hi");
    },
    [uniqueKey]: "Hello, JavaScript",
};

Object.defineProperty(person, "name", { enumerable: false });

// 문자열이라면 열거 불가능도 배열로 반환
console.log(Object.getOwnPropertyNames(person)); // [ 'name', 'age', 'say' ]

// symbol 반환
console.log(Object.getOwnPropertySymbols(person)); // [ Symbol(keyboard cat) ]

// 본인이 소지한 모든 key들 배열로 반환
console.log(Reflect.ownKeys(person)); // [ 'name', 'age', 'say', Symbol(keyboard cat) ]
바로 아래만 주제와는 관련 없는 내용입니다.
굳이 읽지 않아도 됩니다.
1
2
// 주제와는 상관 없는 내용
console.log(Object.getOwnPropertySymbols(Array.prototype)); // [ Symbol(Symbol.iterator), Symbol(Symbol.unscopables) ]
Symbol(Symbol.iterator)라는 symbol을 가지고 있다고 나오는데 이 symbol이 이터러블의 핵심입니다.
우리가 통상적으로 “string/array는 이터러블해서 for ~ of/spread operator를 사용할 수 있어.” 라고 하지만 그러면 그 이터러블이란 대체 뭘까요?
궁금하시다면 배열은 어떻게 동작할까?를 참고해주세요.
🔥 객체 다루는 방법
0️⃣ 객체 확장
기존 객체에 새로운 property들을 유연하게 추가하는 방법입니다.
1. Object.assgin()
깊은 복사가 적용됩니다.
1
2
3
4
5
6
7
8
9
10
11
const person = {
  name: "alice",
  age: 26,
};

const extendedPerson = Object.assign(person, { gender: true });

console.log(person); // { name: 'alice', age: 26, gender: true }
console.log(extendedPerson); // { name: 'alice', age: 26, gender: true }

console.log(person === extendedPerson); // true
2. spread operator
얕은 복사가 적용됩니다.
단, property의 value가 객체라면 깊은 복사가 적용됩니다.
본인이 가지고 있는 enumerable한 property만 적용됩니다.
1
2
3
4
5
6
7
8
9
10
11
12
13
14
const person = {
  name: "alice",
  age: 26,
};

const extendedPerson = {
  ...person,
  gender: true,
};

console.log(person); // { name: 'alice', age: 26, gender: true }
console.log(extendedPerson); // { name: 'alice', age: 26, gender: true }

console.log(person === extendedPerson); // false
1️⃣ 객체 직렬화와 파싱
JavaScript에서의 객체 직렬화는 객체를 모두 string 형식으로 바꾸는 것을 의미합니다.
파싱은 직렬화된 string을 다시 객체로 바꿔주는 것을 의미합니다.
1. JSON.stringify()
객체를 직렬화해주는 정적 메서드입니다.
함수, 정규표현식, Error 객체, undefined는 직렬화 대상에서 제외됩니다.
NaN, Infinity, -Infinity, null은 null로 직렬화 됩니다.
1
2
3
4
5
6
7
8
9
10
11
12
13
14
15
16
17
18
19
20
21
22
23
24
25
26
27
28
29
30
31
32
33
const person = {
  name: "alice",
  age: 26,
  birth: new Date(1998, 11, 06),
  say() {
    console.log("hi");
  }
};

// 전체 적렬화
console.log(JSON.stringify(person)); // "{"name":"alice","age":26,"birth":"1998-12-05T15:00:00.000Z"}"

// 부분적으로 직렬화
console.log(JSON.stringify(person, ["name", "age"])); // "{"name":"alice","age":26}"

// 문자열 간격 제어
console.log(JSON.stringify(person, ["name", "age"], 2));
/**
 * {
 *   "name": "alice",
 *   "age": 26
 * }
 */

// 부분적 직렬화 2 ( callback )
console.log(
  JSON.stringify(person, (key, value) => {
    // "null"은 직렬화 대상이기 때문에 의도적임을 표현하기 위해 명시적으로 "undefined"를 반환
    if (typeof value === "number") return undefined;

    return value;
  })
); // {"name":"alice","birth":"1998-12-05T15:00:00.000Z"}
2. JSON.parse()
직렬화된 string을 객체로 만들어주는 정적 메서드입니다.
직렬화된 Date같은 경우는 객체로 되돌려주지 않기 때문에 직접적으로 변경시켜줘야 합니다.
1
2
3
4
5
6
7
8
9
10
11
12
13
14
15
16
17
18
const person = {
  name: "alice",
  age: 26,
  birth: new Date(1998, 11, 06),
};

const stringifiedPerson = JSON.stringify(person);

// 파싱
console.log(JSON.parse(stringifiedPerson)); // { name: 'alice', age: 26, birth: '1998-12-05T15:00:00.000Z' }

console.log(
  JSON.parse(stringifiedPerson, (key, value) => {
    if (key === "birth") return new Date(value);

    return value;
  })
); // { name: 'alice', age: 26, birth: 1998-12-05T15:00:00.000Z }
3. toJSON()
직렬화할 객체가 toJSON()을 갖고 있다면 toJSON()의 결괏값으로 직렬화됩니다.
대표적으로 Date 객체는 Date.prototype.toJSON()을 갖고 있습니다.
1
2
3
4
5
6
7
8
9
10
11
const person = {
  name: "alice",
  age: 26,
  birth: new Date(1998, 11, 06),

  toJSON() {
    return "Hello, JavaScript";
  },
};

console.log(JSON.stringify(person, ["name", "age"], 2)); // "Hello, JavaScript"
2️⃣ ES6 이후의 객체 문법
단축 프로퍼티((1)), 단축 메서드((2)), 계산된 프로퍼티((3)), Symbol을 key로 사용((4)), getter/setter((5)) 등의 기능이 있습니다.
1
2
3
4
5
6
7
8
9
10
11
12
13
14
15
16
17
18
19
20
21
22
23
24
25
26
27
28
29
30
31
32
33
34
35
36
37
38
const name = "alice";
const age = 26;

const personES5 = {
  name: name,
  age: age,
  say: function () {
    console.log("hi");
  },
};

const genderKey = "gender";
const genderValue = true;

const uniqueKey = Symbol("keyboard cat");
const uniqueKey2 = Symbol("keyboard cat");

const personES6 = {
  // 단축 프로퍼티 (1)
  name,
  age,
  // 단축 메서드 (2)
  say() {
    console.log("hi");
  },
  // 계산된 프로퍼티 (3)
  [genderKey]: genderValue,
  // symbol key 사용 (4)
  [uniqueKey]: `"uniqueKey"를 제외한 그 어떤 값으로도 접근이 불가능한 프로퍼티`,
};

// Symbol key 사용 (4)
console.log(personES6[uniqueKey]); // "uniqueKey"를 제외한 그 어떤 값으로도 접근이 불가능한 프로퍼티
console.log(uniqueKey === uniqueKey2); // false

// 단축 메서드 차이 (2)
console.dir(personES5.say); // 생성자 함수 사용 가능 ( "prototype" 속성 있음 )
console.dir(personES6.say); // 생성자 함수 사용 불가능 ( "prototype" 속성 없음 )
다음은 getter/setter에 대한 예시입니다.
밑줄 _ 로 시작하는 프로퍼티는 객체 내부에서만 활용하고, 외부에서는 건드리지 않는 것이 관습입니다.
1
2
3
4
5
6
7
8
9
10
11
12
13
14
15
16
17
18
19
20
21
22
23
24
25
26
27
28
29
30
31
32
const person = {
  get name() {
    return this._name;
  },
  set name(name) {
    if (name.length < 4) {
      this._name = "";
      throw new Error("이름이 너무 짧아요!");
    }

    this._name = name;
  },
};

try {
  person.name = "ali";
} catch (error) {
  console.error("error >> ", error); // error >>  Error: 이름이 너무 짧아요!
} finally {
  console.log(person.name); // ""
}

try {
  person.name = "alice";
} catch (error) {
  console.error("error >> ", error);
} finally {
  console.log(person.name); // "alice"
}

// "_"로 시작하는 프로퍼티는 직접적으로 건드리지 않는 것이 관습
console.log(person._name); // "alice"
🤔 생각해볼 만한 것
- 객체의
key는string | symbol만 가능한데array는 어떻게number를 사용하는 걸까? - 리터럴은 어떻게 메서드를 사용할까? ( ex)
"str".toLocaleUpperCase()) - 아래 예시에서
(1)과(2)의 차이는 무엇일까? 그리고(3),(4)의 결과와 그 이유는 무엇일까?
1
2
3
4
5
6
7
8
9
10
11
12
13
14
15
16
17
18
19
20
21
22
23
24
25
26
27
28
29
30
31
32
33
34
35
36
37
38
39
40
41
42
43
44
45
46
47
48
function Person (name) {
  this.name = name;
  // (1)
  this.say1 = function () {
    console.log(`1. Hello, ${this.name}`);
  }
  // 오버라이딩
  this.move = function () {
    console.log(`1. moving, ${this.name}`);
  }
};

// (2)
Person.prototype.say2 = function () {
  console.log(`2. Hello, ${this.name}`);
};
Person.prototype.move = function () {
  console.log(`2. moving, ${this.name}`);
}

const person = new Person("alice");
person.say1(); // (1) "1. Hello, alice"
person.say2(); // (2) "2. Hello, alice"
person.move(); // (3) ?

person.__proto__.move(); // (4) ?

// ========== 구분선 ==========

class Person {
  constructor(name) {
    this.name = name;
    // (1)
    this.say1 = function () {
      console.log(`1. Hello, ${this.name}`);
    };
  }

  // (2)
  say2 () {
    console.log(`2. Hello, ${this.name}`);
  };
}

const p = new Person("alice");

p.say1(); // (1) "1. Hello, alice"
p.say2(); // (2) "2. Hello, alice"
💡 Tip
console.dir()을 사용하면 더 자세한 형태를 확인할 수 있다.console.dir()로 봤을 경우 옅은 색은 열거 가능하지 않은 프로퍼티다.[[]]로 감싸져 있는 프로퍼티는 일반적으로 접근할 수 없다.
📮 레퍼런스
- « 자바스크립트 완벽 가이드 6장 » ( 데이비드 플래너건 지음, 한성용 옮김, 인사이트, 2022 )
- « 코어 자바스크립트 6장 » ( 정재남 지음, 위키북스, 2019 )
- MDN - Trailing commas
- MDN -
Object.defineProperty() - MDN -
Object.prototype.__proto__ - MDN -
Object.getPrototypeOf() - MDN -
Object.setPrototypeOf() - MDN -
Object.prototype.hasOwnProperty() - javascript.info - 프로퍼티 getter와 setter